

Windac is a program called a CD-ripper. This produces perfect copies of a track on a CD into a wav file on your hard drive. It is much faster than recording. Depending on the speed of your CD-ROM drive, copying an entire song can take less than a minute. Compare that to waiting for the whole song to finish, 3-4 minutes on a Recording program!
It is a relatively short download, about 328 KB.
Once you have downloaded the file, unzip it. Then go into this new Wndac folder and right click on the Win95.ini file and click Install. This will copy all the files to your Program Files folder and add Shortcuts to your Start Menu.
Once this is complete, click on your Start Menu and go to Programs, Digital Audio Copy, then Digital Audio Copy for Win32. Click on Register Later, then OK on the next nag screen.
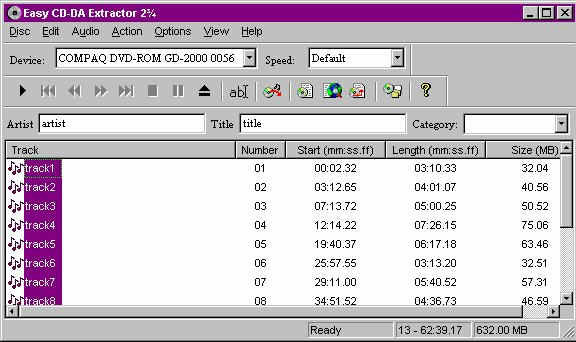
If there isn't already a CD in your CD-ROM, load the one with the songs you would like to copy. This will load up your track list. Here is a picture of the Toolbar and an explanation of what each button does:

Basically the ones you need to worry about the most are the Copy Track Buttons.
Ok, now to selecting the track(s) to copy. You can select a track to copy by clicking it. You can copy more tracks by holding down Shift and clicking each of them.
When you are decided on which tracks to copy, it is time to use your Copy Button.
The first one is the main one... this will copy all of your tracks to your hard drive using your CDplayer.ini file for file names. The middle one copies the songs in "Track1, Track2" format. The last one is a button that copies only a specified amount of time on a track, i.e. making a song clip. This is only available for registered users.
When you click on the Copy Track button, a new window will open that looks like this:
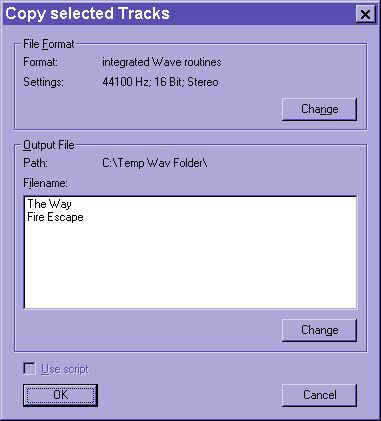
File Format is the Setting in which your track will be copied to. 44100 Hz, 16 bit Stereo is CD quality, 22050 Hz and so forth. The higher the setting, the larger the wav file will be before you compress it MPEG. I do recommend recording in 44100 or 22050 rather than 10025 Hz due to my findings that the higher the setting you originally copy in, the better the wav file will sound when you compress it to MPEG. (Note: You can also copy a wav in MPEG format. Although I do not recommend it, it will be explained later on in the tutorial.)
To change your Settings, click on the Change button under File Format. Keep it on intergrated wav routines and click the Configure button. Then choose your Samplingrate, Resolution and Channel. When you are done, click OK. Then click Apply, then OK.
Under Output File is where you select where you want the wavs to be copied to. To change this folder, click on the Change button under Output File and browse to the folder of your choice.
When you are done, click OK. The track(s) will start to copy. If you have selected more than one track, and are unregistered, there will be a little box for you to click in between tracks.
When it is done, it will say Copy Completed. Then you are all set to compress your wavs to MPEG.
![]()
I do not particularly like this feature, but some people do. I find it to produce lower quality wavs... ones with hisses on the S's and they can sound a little bit fuzzy at times. But I do want to present this option to you as well.
Go about the same steps as above, until you come to File Format. Click on Change, and where the drop-down menu where "intergrated wav routines" is, click on it and select "Fraunhofer IIS MPEG Layer-3 Codec (Advanced)".
You can then hit Configure and select your settings. Click on Ok, then Apply and OK. It will then copy your tracks directly into MPEG.
~Written by RnA Julie~

Click here to download CD-DA Extractor
Once you get it downloaded you need to install it by clicking on the .exe file. It will prompt you with a question "This will install Easy CD-DA Extractor 3. Do you wish to continue?" You click on yes. Your computer will automatically extract the software.
If you want to read more about the software, read the help pages.
Insert your CD into your CD-Rom, and your computer will load the tracks. Be sure you stop the windows CD-player as you will be using the CD Ripper instead.
To run the software, click on the Start menu, scroll to Programs, Easy CD-DA Extractor 3, and again Easy CD-DA Extractor 3 (this is the Win 95, 98 version) click on "Let me try" (since this is a trial version) and then OK. Then A window will open its called Easy CD-DA Extractor 3. Across the menu bar on the top, you will see Disc - Edit - Audio - Action - Tools - Options - View - Help.
The Device should be the
brand of CD player you own (i.e COMPAQ DVD-Rom) The speed should be set at Default.
The Artist is set at the initial of artist I am recording and title is title...I go
to where the tracts are listed and rename them to what I want to name the song. Just
right click and you will see edit tract name.
As you see the list of tracks, click on the track you wish to record. Then click on
Action then on Copy Selected Track. A widnow will open name is Copy Selected
Track...you will see Output Format and 4 spaces...
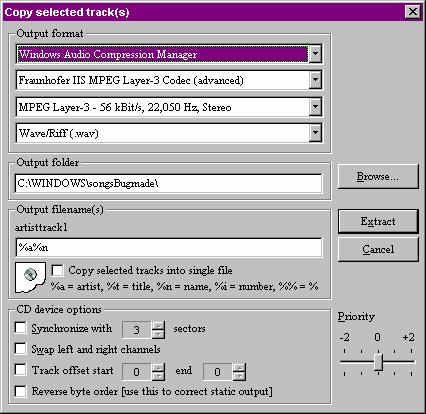
1st space is...Windows Audio Compression Manager
2st space is...Fraunhofer llS Mpeg Layer-3 codec (advanced)
3rd space is...MPEG Layer-3 56k bit/s 22,025 Hz Stereo
4st space is...Wave/Riff(.wav) <----always make sure this one is this....
Output Folder...This is where you want the wav to go to...I have mine set at C:/America
Online 4.0 theres a Browse button to change and look for the folder you want your wavs to
be recorded to...
Output Filename
Type in what you want to name your wav
CD device Options
This part I never alter and is set with none of the boxes check and left empty and a
synchronize 3 indicated. Once the settings are in place, click on the Extract button
and it will extract the song and convert it into a wav. Always verify that the 4th
space is Wave/Riff(.wav). If it isn't, the track will be converted into an mp3 file
instead of an Mpeg3 compressed wav.
3rd space is MPEG Layer-3 56k bit/s 22,025 Hz Stereo<---this is what I record at and
then I go back and re-compress it. When I recorded at a different setting most
people could not play the wav in a chatroom. That is why I record at the hightest
setting and then go back and compress at 32k bit/s 11,025 Hz Stereo. This reduces
the problem and enables people to play and hear the wavs.
~Written by WavNBuggg~
![]()
Previous l Next l Home l List Rules l Disclaimer l About Us l Software l MPeg Layer-3 l How to use a CD Ripper l How to Compress Wavs l Technical Support l Other Lists l Wav Sites l Email